
How to Size a 12V Water Pump for Your Cold Plunge (Step-by-Step)
TL;DR: Sizing a 12V cold plunge pump takes five steps: measure your tub volume; set a target flow from turnover rate (or your chiller’s specified range, which overrides everything); total up the loop’s real head losses — in a closed loop that’s the chiller, filter, and plumbing, not elevation; check the chiller match; then decide whether the 12V brushless DC path or the mains AC path fits your build. A worked 100-gallon example runs through every step below. The one number to respect above all: your chiller’s specified flow range — too little flow risks ice in the heat exchanger, too much buys nothing.
How do you size a 12V water pump for a cold plunge?
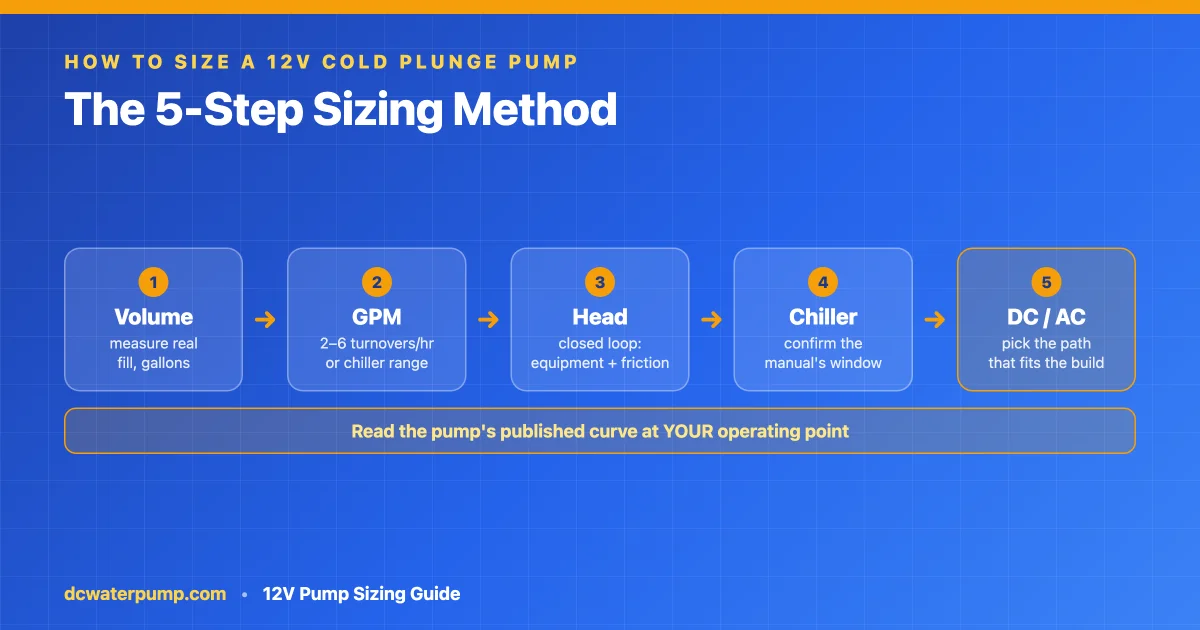
To size a 12V cold plunge pump: (1) measure tub gallons; (2) set flow by turnover — commonly 2–6 tub volumes per hour; (3) total the loop’s head losses (chiller, filter, pipe); (4) confirm the flow sits inside your chiller’s specified range; (5) choose brushless DC for quiet, continuous, low-power duty.
Why 12V sizing gets answered badly
Search this topic and you’ll find AC pump guides that never mention DC, generic 12V pump roundups written for RVs and ponds that never mention cold plunges, and three Reddit threads full of owners asking questions the blogs didn’t answer. The gap exists because 12V DC sizing isn’t a scaled-down version of AC sizing — it’s the same physics with different equipment logic: DC builds tend to be designed systems (a pump matched to a loop, like the 12V pumps inside commercial plunges) rather than component swaps (a garage build around whatever 120V pump is popular this year). This guide walks the five steps that cover both, then helps you pick a path.
New to what the pump even does in a plunge? Start with our primer and come back — this article assumes you know the loop: tub → pump → filter → chiller → tub.
Step 1 — V: Measure your volume
Everything downstream scales from tub volume. Measure the water you actually fill, not the tub’s brochure capacity — displacement matters (you’re in there too) and most people fill to a line, not the brim. Common sizes: barrel plunges 80–120 gallons (300–450 L), chest-freezer conversions 60–100 gallons, commercial one-piece plunges often less than you’d guess because the shell is molded tight to the body.
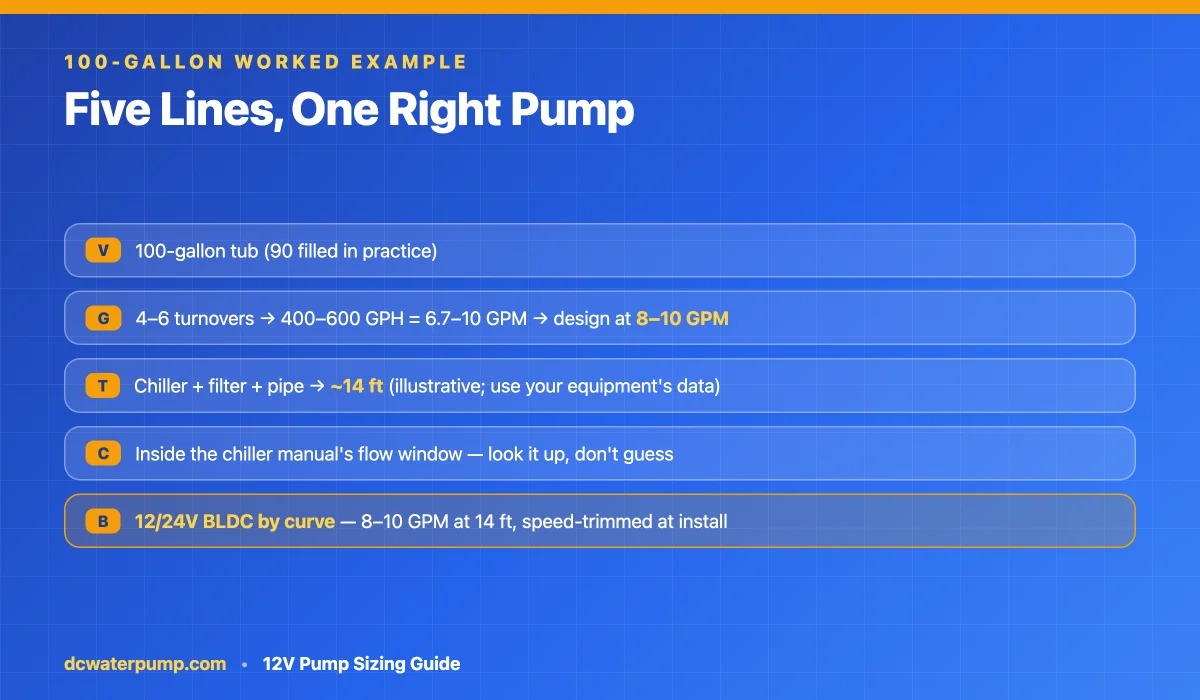
Worked example: a 100-gallon (379 L) backyard barrel plunge, filled to 90 gallons in practice. We’ll carry 100 gallons through the math for round numbers.
Step 2 — G: Set your target flow (GPM/GPH)
Flow targets come from turnover — how many times per hour the full volume passes through the filter and chiller:
- Bare minimum (no chiller, occasional use): turn the volume over every 30 minutes — 2× per hour — per Plunge Junkies’ sizing guide. For 100 gallons that’s 200 GPH (≈3.3 GPM) of delivered flow.
- Comfortable continuous duty (chiller system): 4–6 turnovers per hour, the guidance our mistake guide uses. For 100 gallons that’s 400–600 GPH — 6.7 to 10 GPM. We’ll design toward the upper half of that band and carry 8–10 GPM (480–600 GPH) through the rest of the worked example.
- The override: if you run a chiller, its manual’s specified flow range beats any turnover rule. Plunge Junkies’ general band for chiller setups is 500–1,800 GPH with most builds comfortable around 1,000–1,200 GPH — but the number printed in your chiller’s manual is the one that counts, a point we’ve covered in depth.
One warning deserves its own box, because it’s the failure that costs a heat exchanger: too little flow can freeze the chiller from the inside. Owners on r/coldplunge relay the explanation their chiller maker’s support gave — with insufficient flow, water lingers in the heat exchanger long enough to ice up. Undersizing isn’t frugal; it’s the one direction the sizing math punishes hardware for.
Step 3 — T: Total the real head losses
Here’s where 12V spec sheets betray beginners: a “3 m max head” pump delivers its rated flow only near zero head, and your loop is not zero head. The good news, covered in detail in our max head vs flow rate guide: a cold plunge is a closed loop returning water to the same tub, so net elevation is roughly zero — the suction-side water column offsets the lift. What remains is friction and equipment:
| Loss source | Illustrative figure | Where the real number lives |
|---|---|---|
| Net elevation (closed loop) | ~0 ft | Your plumbing layout (count only a return fitting above the waterline) |
| Chiller coil | ~5–10 ft | Chiller manual’s pressure-drop spec at your flow |
| Filter (clean) | ~4–6 ft | Filter documentation; grows as it loads |
| Pipe, elbows, fittings | ~1–2 ft (short runs of adequately sized tubing) | Friction tables for your pipe diameter at your flow — undersized or long runs multiply this several-fold |
An illustrative full loop lands somewhere in the 10–18 ft (3–5.5 m) band — which is why a 12V pump whose max head is 3 m (≈10 ft) can be a poor fit for a chiller-and-filter loop even though the number looks adequate: at 10 ft of system head, that pump is at the dead end of its curve delivering almost nothing. Read candidate pumps’ flow-vs-head curves at your computed head, and treat any pump that doesn’t publish a curve as un-sizeable.
Worked example continued: our 100-gallon build with chiller and filter assumes 14 ft of losses. Target: a pump delivering 8–10 GPM at 14 ft (4.3 m) — which points at 12V pumps with max head comfortably beyond 4.3 m, selected by curve, not by headline.
Step 4 — C: Check the chiller match
The chiller decides how much cooling you have; the pump only decides whether that cooling reaches the water. Two checks close the loop:
- Capacity sanity check. Recovery Rituals’ chiller guide gives the heat-removal formula: gallons × 8.33 × temperature drop (°F) = BTU of heat to remove. For 100 gallons pulled from 65°F to 45°F, that’s 100 × 8.33 × 20 ≈ 16,700 BTU — a quantity of heat, not a rate. Divide by your acceptable pull-down time to size the chiller: over 4 hours, ≈4,200 BTU/h, which lands in the 1/3–1/2 HP class for typical units. (Faster pull-down or a warm garage pushes you up a size.)
- Flow window check. One warning about shortcuts here: community shorthand likes to map chiller class to flow (“1/3 HP → 500–700 GPH”), but actual manufacturer ranges vary enormously between models of the same horsepower — one 1/3 HP class chiller manual specifies 480–2,400 GPH. HP-class rules of thumb are a fallback for when no manual exists; when the manual exists, it is the spec. Engineering references for large chilled-water systems (e.g., Johnson Controls’ design guide) enforce minimum tube velocities to prevent fouling and freeze — the same principle, at industrial scale, as the freeze warning in Step 2.
Worked example continued: the 100-gallon build’s 8–10 GPM (480–600 GPH) target lands inside the published range of many home-class chillers — but the final check is a lookup, not a formula: open your chiller’s manual and confirm the window before the pump order goes in.
Step 5 — B: Brushless DC or AC — pick your path
Both paths work. They’re different tools:
| Mains AC pump (e.g., magnetic-drive) | 12/24V brushless DC (BLDC) | |
|---|---|---|
| Power at the tub | 115/230V mains | Low-voltage DC via adapter, battery, or solar |
| Typical draw | One mainstream 1,200 GPH AC unit lists 145W (manufacturer spec) | Sized to the loop — the 12V pump inside one commercial plunge draws 6.5W at 7 L/min (owner teardown); larger BLDC circulation classes run in the tens of watts |
| Noise | Line-frequency hum, varies by unit | Quality units below 35 dB; no brushes or rubbing seal to hum |
| Continuous duty | Yes, with seal/bearing wear | Designed for it — ~30,000-hour design lives; bearings remain the wear item |
| Speed | Fixed | Adjustable (PWM / 0–5V / potentiometer) — trim flow to the chiller instead of buying a new pump |
| Sourcing | Retail, fast replacement | OEM/design-in oriented |
Three honesty notes on that table. First, the wattage rows are not a like-for-like flow comparison — the 6.5W pump moves far less water than the 145W unit; the real lesson is that DC systems get matched to the loop, and a matched small loop sips power. Second, the sub-35 dB and ~30,000-hour figures are published design specs of quality BLDC circulation pumps (ours included), not laws of the technology — demand them per model on the datasheet rather than assuming them from the “BLDC” label. Third, per our own scoping rule: a 12V BLDC pump is not a plug-in replacement for an existing AC pump — it needs its own DC supply and belongs in builds designed around it.
Choose the AC path if you’re doing a standard garage build around retail parts and want same-week replacements. Choose the 12V DC path if you’re designing a system — a portable or off-grid plunge, a build where sub-35 dB matters (the pump often sits a meter from your head — our silent cold plunge pump guide covers what that number really means), an energy-budgeted setup, or a commercial product where duty cycle and controllability are spec lines. Adjustable speed is the quiet superpower of the DC path: dial delivered flow into the chiller’s window at install time, no plumbing changes.
Worked example concluded: the 100-gallon build lands on a 12/24V BLDC circulation pump selected by curve for 8–10 GPM at ~14 ft, speed-trimmed on install into the chiller’s specified window. If you’re an equipment builder speccing this class, BLDC PUMP’s cold plunge range covers it — pumps built since 2009, standard samples in 3–7 working days.
Frequently asked questions
How many GPH should a cold plunge pump have?
Without a chiller: at least 2 tub turnovers per hour (200 GPH for a 100-gallon tub), with 4–6 turnovers more comfortable for regular use. With a chiller: whatever flow range the chiller’s manual specifies — commonly 500–1,200 GPH for home units — delivered after head losses, not rated at zero head.
Can a 12V DC pump replace my AC cold plunge pump?
Not as a plug-in swap — a 12V pump needs its own DC power supply and belongs in systems designed around DC from the start. In a new build or a portable/off-grid design, 12V BLDC is often the better-fitting choice; in an existing AC-plumbed setup, replacing like with like is the simpler path.
How many watts does a 12V cold plunge pump use?
It scales with flow and head. At the small end, the 12V pump inside one commercial plunge draws about 6.5W moving 7 L/min; larger BLDC circulation pumps for full-size loops run in the tens of watts. Mains AC pumps in the same application commonly list around 145W — though at higher flow, so compare at your target operating point, not by nameplate alone.
Are BLDC pumps quiet enough for an indoor cold plunge?
Quality BLDC circulation pumps run below 35 dB — quieter than a whisper-level library hum — because there are no brushes and no rubbing shaft seal. For indoor or bedroom-adjacent installs, that’s the spec to demand in writing on the datasheet.
Can I run a 12V pump 24/7?
That’s what circulation-class BLDC pumps are designed for — continuous duty with design lives around 30,000 hours (about 3.4 years of nonstop running), with bearings as the long-term wear item. Two conditions: keep the suction flooded (these are not dry-run-tolerant pumps), and stay inside the rated duty on the datasheet.
What size 12V pump do I need for a 100-gallon cold plunge?
Follow the worked example: 8–10 GPM (480–600 GPH) delivered at your loop’s computed head (illustratively ~14 ft with chiller and filter), confirmed inside your chiller’s specified flow range. Select by the pump’s published curve at that operating point.
What happens if my pump is too small for the chiller?
The dangerous failure isn’t weak cooling — it’s ice. With insufficient flow, water can linger in the chiller’s heat exchanger long enough to freeze, which can damage the exchanger. If your delivered flow can’t reach the chiller’s stated minimum, fix the pump choice or the plumbing losses before running the system cold.
Where to go next
The physics behind Step 3 lives in Max Head vs Flow Rate; the scenario logic behind “do I even need a chiller” lives in Cold Plunge vs Ice Bath; and the full buyer’s checklist — including the mistakes this guide helps you avoid — is the cold plunge pump mistake guide.